Objects & Inspector
MoveMusic Control VR allows you to create complex MIDI controller layouts by building up from basic, customizable objects. Currently, there are three main object types in MoveMusic:
- Hit Zones are spheres that can be hit to send MIDI Notes or CCs.
- Morph Zones are spaces you can move your controller through to send MIDI CCs. They can take the form of sliders (1D), XY pads (2D), or 3D XYZ cubes. Hold down the trigger button on your controller to use a Morph Zone.
- Text Labels are simple 3D text objects to help you label your layout.
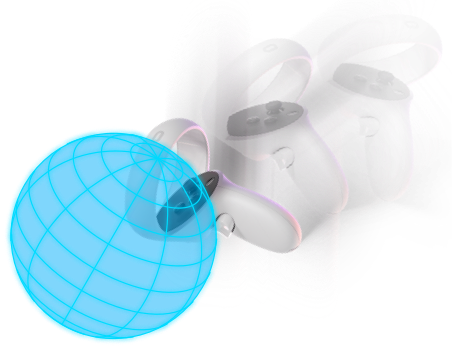
Hit Zone
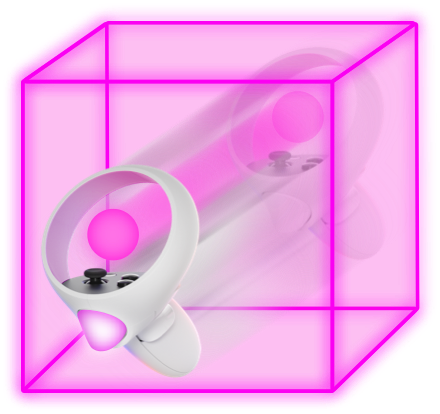
Morph Zone
Inspector: Edit Objects
Objects can be configured using the Inspector menu. Open the Inspector menu by pressing the edit button ![]() (X button) on the left-hand controller. You can hide this menu by pressing the same button. With the Inspector open, grab any object you want to edit and the Inspector will display its settings. You can scroll through settings by moving either controller thumbstick down or up. Press the trigger button to interact with your controller pointer.
(X button) on the left-hand controller. You can hide this menu by pressing the same button. With the Inspector open, grab any object you want to edit and the Inspector will display its settings. You can scroll through settings by moving either controller thumbstick down or up. Press the trigger button to interact with your controller pointer.
See the following sections for explanation about the unique Inspector settings for each object.
Inspector Controls: Value Sliders
Numeric values in the Inspector are displayed in a value slider. You can press the plus button to increment the value, the minus button to decrement the value, or click on the value and drag left/right to move it up or down quickly. You can also double click on the value to manually enter a value using the virtual keyboard.
If you are editing multiple objects at once with the inspector, these sliders may also show the join button ![]() which will join all object values to match. Learn more about multi-object editing
which will join all object values to match. Learn more about multi-object editing
Hit Zones
Hit Zones can be used to play musical notes, trigger audio like drum sounds, toggle settings in your DAW, and much more. Simply hit a Hit Zone with your controller to trigger its assigned action. You can assign a Hit Zone to send MIDI Note or MIDI CC messages.
Behaviors
Hit Zones have 3 different Behavior types you can choose from:
- Hold : Useful for holding sustained MIDI Notes until you remove your controller from the Hit Zone. When a controller enters the Hit Zone it will send a MIDI Note-On message (or MIDI CC of 127). When the the last controller exits the Hit Zone it will send a MIDI Note-Off message (or MIDI CC of 0).
- Timed : Useful for triggering MIDI Messages that will stay active for a specified amount of time in milliseconds or seconds. When a controller enters the Hit Zone it will send a MIDI Note-On message (or MIDI CC of 127). After a configurable amount of time, it will send a MIDI Note-Off message (or MIDI CC of 0) regardless of when controllers leave the Hit Zone.
- Toggle : Useful for toggling controls in your DAW. Each time a controller enters the Hit Zone it will toggle between sending a MIDI Note-On message (or MIDI CC of 127) and sending a MIDI Note-Off message (or MIDI CC of 0). The Hit Zone will appear highlighted when it is toggled on, and darkened when it is toggled off.
MIDI Message Types
Hit Zones can either send MIDI Note data or MIDI CC data when you interact with them.
- MIDI Note : Useful for playing musical notes, triggering audio sample, or toggling settings in some DAWs. You can choose the note number, octave, and MIDI channel. If you turn on the Dynamic switch, the velocity of your hits on the Hit Zone will affect the MIDI note velocity, otherwize you can set a static velocity.
- MIDI CC : Useful for setting a parameter or button in your DAW to fully on or off. You can choose the MIDI CC number and channel.
Morph Zones
Morph Zones are used to control parameters in your DAW that support MIDI CC mapping. Simply hold down the trigger button and move your controller through the Morph Zone space to send MIDI CC messages. For each axis/dimension of the Morph Zone, the handle's position along that axis determines the value of the MIDI CC message being generated, with MIDI CC values spanning from 0 to 127 along each axis.
You can use this to control audio effects (filters, reverbs, delays, etc.), manipulate parameters of virtual instruments, or control looping and mixer settings of your DAW. Some advanced instrument/MIDI plugins offer new gestural posibilities like being able to bow a cello with a Morph Zone using Arche Cello or waving your hand in a Morph Zone to strum a chord of notes with Strum.
Dimensions
Morph Zones can be configured to have 1, 2, or 3 dimensions of control:
- 1D : Turns the Morph Zone into a slider/fader allowing it to send 1 MIDI CC value for its single dimension (X: width).
- 2D : Turns the Morph Zone into a square XY Pad allowing it to send 2 unique MIDI CC values, one for each dimension (X: width, Y: height).
- 3D : Turns the Morph Zone into a cube allowing it to send 3 unique MIDI CC values, one for each dimension (X: width, Y: height, Z: depth).
MIDI CC Message Settings
Morph Zones can only send MIDI CC data (not MIDI Notes for now). In the Inspector, you can assign a different MIDI CC message (CC control ID, and channel) for each axis. Additionally you can solo or mute each axis MIDI mapping which is helpful when you are MIDI Mapping in your DAW. The control value of the MIDI CC data that is generated is determined by the position of the Morph Zone's spherical control handle as explained above.
Release Behaviors
Release Behaviors determine what happens when you stop controlling a Morph Zone by letting go of the trigger button on your controller. The spherical control handle of the Morph Zone will react differently for each behavior.
- Stop (Default) : The control handle stops moving, staying at the last position you were controlling it.
- Return : The control handle returns (snaps back) to its starting position (Return Position). When you select this behavior in the Inspector, the Return Position is set to the current position of the control handle. To choose a Return Position, first set the behavior to "Stop", then move the control handle where you want it, then set the behavior to "Return". You can also press a button in the Inspector to perfectly center the Return Position.
Text Labels
3D text labels can be used to label various parts of your control layout. You can set the text by clicking the textbox in the Inspector and using the virtual keyboard that pops up. You can move your text cursor by double clicking on the textbox and optionally dragging to select multiple characters.