MIDI Mapping
MoveMusic Control VR can be used to control parameters in your DAW music software. In MoveMusic, you could wave your arm through a Morph Zone to control a filter & reverb or hit a Hit Zone to toggle on/off the playback of an audio track. To assign MoveMusic's layout objects to control specific functions of your DAW, you will need to use your DAW's MIDI Mapping system (sometimes called MIDI Learn).

In general, you can play musical notes on your DAW's software instruments without the need for MIDI Mapping by sending MIDI Notes from MoveMusic's Hit Zone objects. MIDI Mapping becomes useful when you want to use MIDI CCs or assign MIDI Notes to control non-note functionality of your DAW such as play/pause, etc.
General MIDI Mapping Guide

Before beginning the MIDI Mapping process, you need to make sure MoveMusic is already connected to your DAW and its MIDI Input has been enabled. See our Initial Setup
While the exact steps for MIDI Mapping vary depending on the specific DAW software you are using, we've included some general steps here. Additionally, you may need to consult the DAW-specific MIDI Mapping guides we've included at the end of this article.
-
Make sure MoveMusic is connected with the MMConnect app running on your computer.
-
In your DAW's Settings menu ➜ MIDI Settings ➜ in the list of MIDI devices, make sure you enable MoveMusic as a MIDI input. (In Ableton, enable both "Track" and "Remote" for the input.)
-
If necessary for your DAW, enter MIDI Mapping mode. Depending on your DAW you may need to do one of the following:
- Click a button in your DAW's toolbar or settings to enter MIDI Mapping mode.
- Press a key command to enter MIDI Mapping mode (Ableton: ⌘ + M or Ctrl + M).
- Select the parameter you want to control in your DAW. Depending on your DAW, you may either:
- Click a control shown in your DAW window such as a volume slider.
- Right click a control in your DAW and choose "Map to Controller", "MIDI Learn", or similar.
- In the DAW's MIDI settings, you may see a list of available parameters that you can assign to a MIDI controller. Click a parameter name from the list of mappable parameters such as "Track 1 Volume".
- Next, in MoveMusic VR, interact with the controller object you want to assign so that MIDI messages get sent to the DAW. Your DAW should automatically detect the action and assign the control to the selected parameter.
- If you're assigning a Morph Zone, first open the Inspector and click the solo ("S") button on the axis you want to assign, then move your controller into the Morph Zone while pressing the trigger button.
- If you're assigning a Hit Zone, hit it with your controller.
- Repeat steps 4 and 5 for each parameter that you want to map to your MoveMusic controller objects.
DAW-Specific MIDI Mapping Guides
Here are some links to MIDI Mapping guides for some of the most popular DAWs:
- Ableton Live : MIDI Mapping
- Logic Pro : Controller Learn Mode and here's an alternate article from Berklee
- FL Studio : Multi-link controllers
- Cubase : Mapping Controls
- Bitwig : Manual Controller Assignment
- Studio One : Control Link MIDI Learn
- Reaper : MIDI/OSC Learn
- Reason : Remote Override Mapping
- Pro Tools : Learn MIDI CC
- Garageband : Does not support standard MIDI Mapping (MIDI Learn) functionality, so you will need to manually assign the MIDI CC values listed here to your MoveMusic control objects using the Inspector.
- Cakewalk by BandLab : ACT MIDI assignment and here's a walkthrough video
Sync DAW and MoveMusic MIDI State
After completing a MIDI mapping for a given DAW and MoveMusic project, you will likely want to reopen the projects at a later time. Sometimes when you reopen your projects, the controls for the parameters you MIDI mapped may appear in your DAW with different values than what is displayed on the controls in MoveMusic. For example, if you MIDI mapped a volume slider, your DAW project may show the volume to be at the maximum value, but in MoveMusic, the Morph Zone slider you assigned to the volume is shown to be at the minimum value.
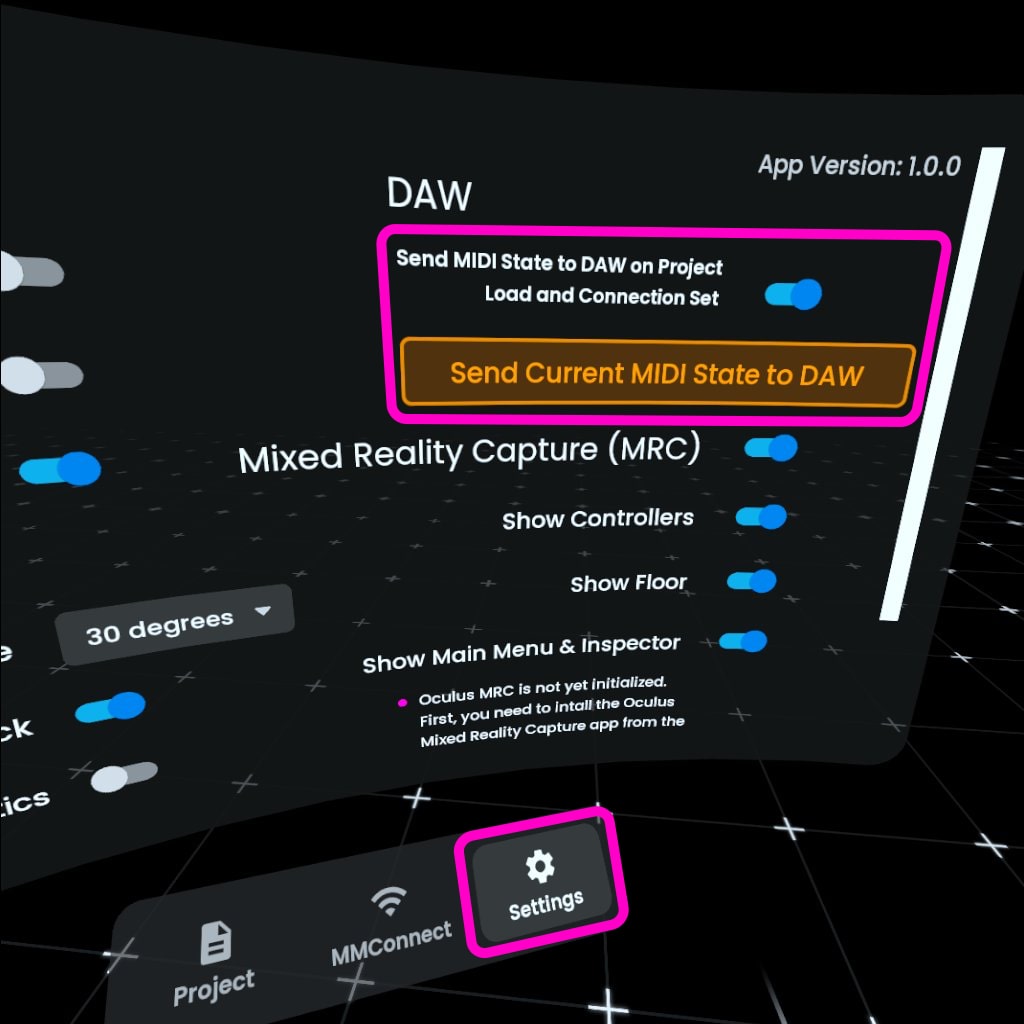
To synchronize the DAW state with the current controller state of MoveMusic, there are some options in the MoveMusic VR app settings. In MoveMusic VR, go to the menu ➜ Settings tab ➜ and look in the top right corner under "DAW".
- The button, "Send Current MIDI State to DAW", will immediatly send the current MIDI CC values and MIDI Note toggle values for all MoveMusic controls to your DAW project. This will force the DAW to synchronize to what MoveMusic controls show.
- The switch, "Send MIDI State to DAW on Project Load and Connection Set", will send the current MIDI CC values and MIDI Note toggle values for all MoveMusic controls to your DAW project any time a new MoveMusic Project is loaded or anytime you choose a connection in the MMConnect tab of the main menu. Once this is switched on, your DAW project should always stay in sync with MoveMusic as long as you open the DAW project before opening the MoveMusic project you want to use.

